LOG-1

Device Setup

Setup instructions

To use the gyro function effectively, please attach in a position where the direction indicator mark faces forward.

The direction indication mark must face the traveling direction, it can be at any angle as long as the mark faces forward.

If the direction of travel and the direction indication mark are not aligned, the gyro function can not be used correctly.

Magnet Setup

Attach so that the magnet can be detected at the magnetic force detection area. Refer to “Magnetic Force Detection Mode” for confirming whether the magnet is detected correctly at the installed position.

Attach the magnets using the fixing holes. The fixing hole can pass through a tie up to 4.8 mm in width and 1.3 mm in thickness.

How to Use the Mounting Bracket

Align the bolt and the nut, then turn the bolt to fix LOG-1 and the mounting bracket.
You can install parallel to the mounting bracket by aligning the lug on the mounting bracket.

Operation of LOG-1

Overview

Modes

Modes Functions
Standby When the device has no tasks, it will enter this mode and save battery power.
Magnetic Force Detection Mode Detect magnetic force via LED notification. Please use this feature for magnet installation.
Logging Mode Get data from sensors and write logs.
Communicate with a PC Extract data or set sampling settings via the PC application.

Operation Under Standby Mode

Behavior Operation Details
Start Logging Press and hold the button for more than 2 sec. The LED will turn to green 3 seconds and start logging.
Magnetic Force Detection Mode Press the button twice. Detect magnetic force via LED notification.
Erase Data Press the button 5 times. Erase all log data from the device. While erasing, the LED will turn orange.
Communicate with a PC Connect to a PC Communicate with a PC.
NOTE
・Erased data can not be recovered.
・Do not disconnect the cable or remove the battery while erasing data.
・The device will not accept any operations if the battery runs out.

Behavior while in Sleep Mode

The device will enter sleep mode when it has no tasks.
While sleep mode, the device will keep time and indicate status of LOG-1 via the LED.
For details about the LED indicator, please refer to this page.

NOTE
・Device can not be powered off completely.

Logging Mode

Start / Stop Logging

Press and hold the button for more than 2 seconds in standby mode to start logging.
Press and hold the button for more than 2 seconds while logging and the LED will blink twice and stop logging.
If connected to a PC or the battery runs out while logging, the device will stop logging.

While Logging

The device will log according to the set sampling settings.
While logging, the LED will blink indicating the status of the device. (For more details, please refer to this page.)

Sampling Settings

You can set sampling settings via the PC application.
For details, please refer to the section “Sensor Options” on this page.

The factory default setting is as follows.

Sampling Ratio 12.5Hz (Every 80ms)
Magnetic Force Detection Feature Enabled
NOTE
・The maximum number of separate logs is 64.
(If 64 separate logs are stored on the device, please extract and erase all data before starting additional logs.)
・The maximum logging duration depends on the sampling setting.
(Under factory default settings and 100% battery level, the device can log for approximately 19 hours. For details, please refer to this page.)

Magnet Detection Mode

Press the button twice quickly in standby mode to enter magnet detection mode. In this mode, the LED will turn from green to red when detecting a magnetic force. After 20 seconds the device will automatically exit magnet detection mode and return to sleep mode.

NOTE
You can not log data or communicate with a PC in this mode.

LED Indicator on LOG-1

LED Indication Patterns for LOG-1 Status

Please check the following table for LOG-1’s status via its LED indicator.

Logging Mode Sleep Mode
Normal Green (Blink) Off
Without Setting Time ※1 Green (Blink High Freq.)
No Battery (Approx. 2.0V or Less) ※2 Red
Low Battery (Approx. 2.0V~2.1V) Red (Blink High Freq.)
Low Memory Orange / Green (Blink Alternately)
  • Blink : Every 3 sec
  • Blink High Freq. : Every 0.5 sec
  • ※1 : Will not notify “Without Setting Time” error during logging mode.
  • ※2 : Logging will stop if battery runs out.

LED Indication Patterns During User Operation

Please check the following table for the LED indication patterns during user operation.

Behavior Operation LED Pattern Remarks
Start Logging Press 3 sec Green 3 sec The LED turns green for 3 seconds. Logging starts moment the LED turns off.
Magnet Detection Mode Click twice Press the button twice quickly to enter magnet detection mode. After 20 seconds the device will automatically exit magnet detection mode and return to sleep mode.
Not Detected Green
Detected Red
Connected to PC Application
Configured with PC Application
Green Blink twice Blinks when connected to PC application or configured via the PC application.
Erase Data Click 5 times / Erase with PC App Orange

How to exactly synchronize a camera and LOG-1

If there is some misalignment between the time held by the camera and LOG-1, please set the time again before using LOG-1.  (See: Set device time)

Also, in order to more accurately synchronize the video and sensor data, please follow the steps below before recording a video.

Steps

  1. Start recording using the camera.
  2. Shoot a scene where the LOG-1 LED is facing the camera.

    If you had already attached both the camera and LOG-1, record a scene where the LOG-1 switch is pressed.
    (For example, the measurement starts after the LED turns off. So first hold your hand in front of the camera and then move your hand as soon as the LED goes out.)

    *This step will synchronize video and sensor data before movie editing.
  3. Please stand the bicycle or other device you have attached LOG-1 to upright for a few seconds.
    Log-1_read_calibration_stay
    *This step will detect gravity direction and calibrate LOG-1 before movie editing.
  4. If possible, tilt the bicycle or other device you have attached LOG-1 to, left and right slowly for a few seconds.
    Log-1_read_calibration_tilt
    *This step is useful for checking whether synchronization and calibration are correct before editing movies.
  5. Continue recording the movie.
    *As you can clip the start and end range of the movie during movie editing, the previous calibration steps can be easily removed from the final video.

When preparation for synchronization is not possible before recording or when there is a period of time between attaching LOG-1 and recording a movie.

Please record a video separately for synchronizing and another for the actual video you want to use.

  1. Take a short video showing LOG-1 switching ON. After that, will LOG-1 continue to log data (data can be logged continuously for 19 hours).
  2. When recording the final movie, use the same camera as in step 1 and take a static video for a few seconds to detect default position.
  3. After all the shots are finished, switch off LOG-1.
  4. When editing the movie, detect the time lag between the camera and LOG-1 by using the video for synchronization and take a note of the sync correction value.
  5. Select the final movie and enter the value noted in step 4 for synchronization. Synchronization can be adjusted in 0.1 second increments.

Import Data

To create an overlay movie, you need two things:

  • Original video (taken with XON REC-1 etc.)
  • Sensor data acquired by LOG-1

Import video files from SD card

* Importing from XON LOG-1 Overlay Movie Exporter can only be used when shooting movies with REC-1. Please copy other cameras directly to the hard disk, or using the camera’s own import tool.

  1. Start “XON LOG-1 Overlay Movie Exporter”.
  2. Click “Import from REC-1 (SD Card)”.
    Log-1_exporter_home_rec-1
  3. Select the REC-1 drive on the SD card.
    Log-1_exporter_data_in
  4. Select the import folder.
    Log-1_exporter_data_out
  5. Click the “Import” button. (It may take some time to import movies, you can check progress with the progress bar at the bottom of the message box)

Import sensor data from XON LOG-1

  1. Start “XON LOG-1 Overlay Movie Exporter”
  2. Click “Import from LOG-1 (USB)” (Or, start “XON LOG-1 Utility” from the desktop.)
  3. Start “XON LOG-1 Utility”.
    Log-1_utirity_home
  4. Connect LOG-1 to the PC, and click “Scan Device”.
    Log-1_utirity_scan_device
    Log-1_utirity_scan_device_ok
  5. If the device is recognized, and click the “Read Data -> PC” button.
    Log-1_utirity_read_data-1
  6. When data import is complete press “OK”.
    Log-1_utirity_read_data_ok-1
  7. Click the close button to finish.


Select video for editing

Select video for editing

  1. Start XON LOG-1 Overlay Movie Exporter.
  2. Click “Create Overlay Movie”.
    Log-1_exporter_home_movie
  3. Click “Change Folder” and select the imported video folder. See also [Import data].
    Log-1_exporter_select_video
  4. The videos in the folders will be loaded, select a video to edit.
  5. Click the “Next” button.
  6. Proceed to “Editing Movies”.

*If you select multiple consecutive videos (the movie files may be divided into one or more recording depending on the camera model and settings), you can use as a single movie.
*For REC-1 videos, the GPS file is also automatically loaded.

Notes

  • If you have not set the time on LOG-1 or the camera, you may not find the data matches.
  • The created-time of the video may be in UTC time or local time depending on the camera model. Please select the check box “Load video by UTC timezone” if necessary.
  • Supported video formats: MP4, MOV (AVC / H.264) and an aspect ratio of 16: 9 (Horizontal)

Editing Movies: Basic Guide

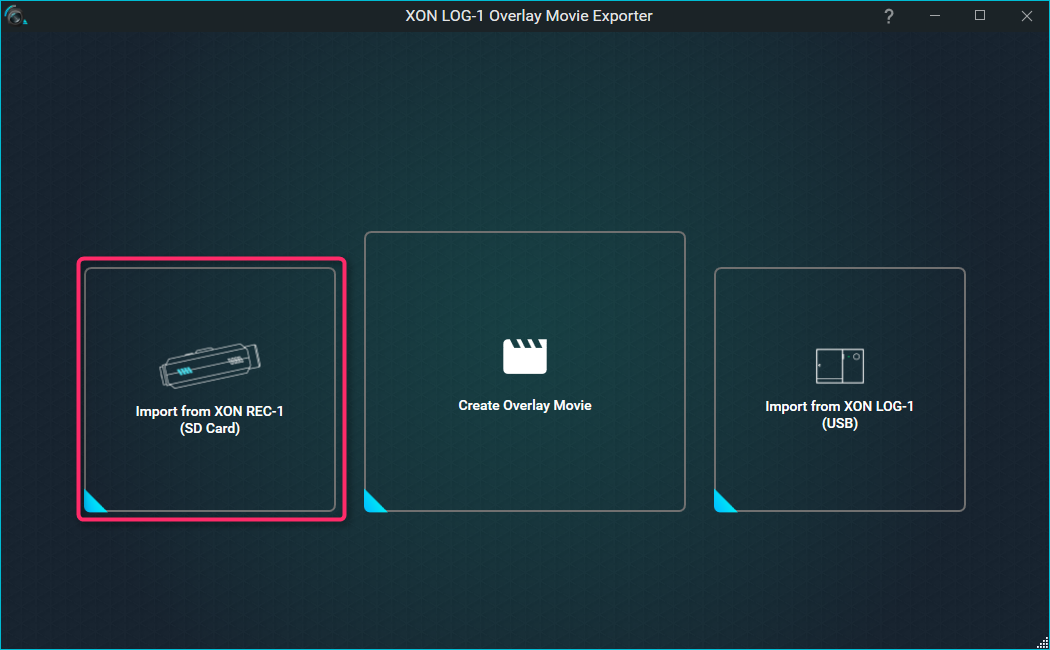
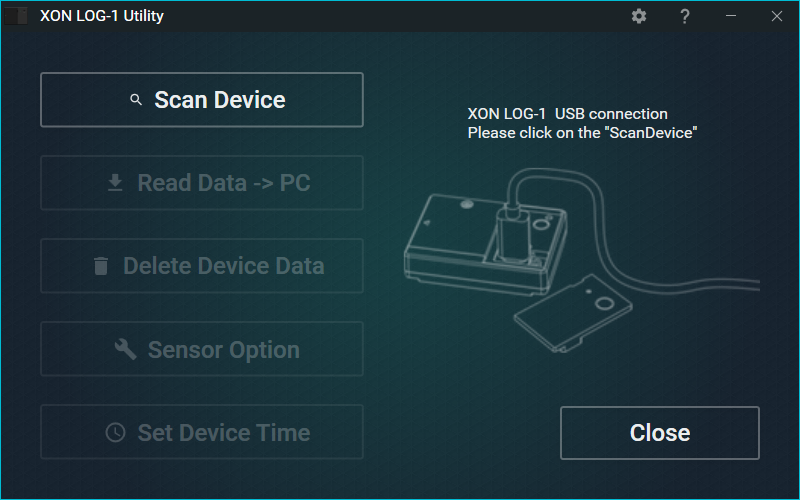
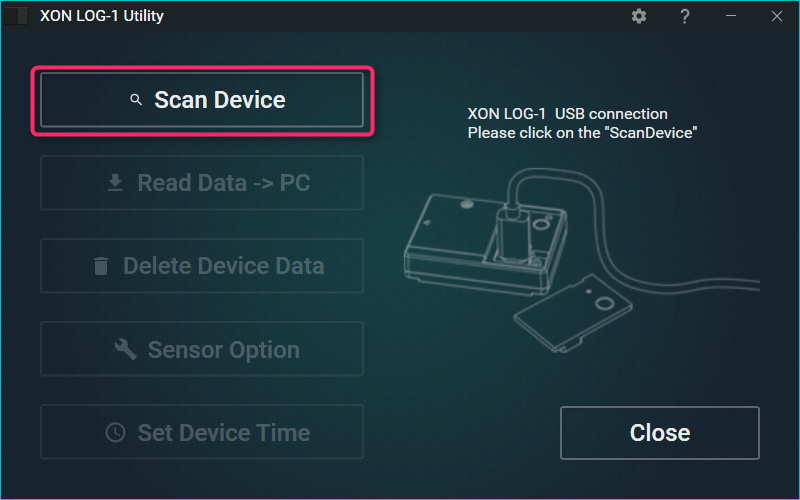
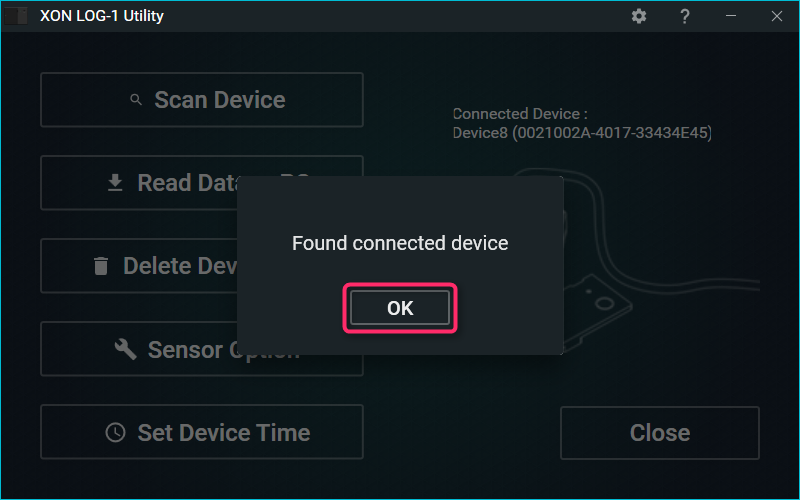
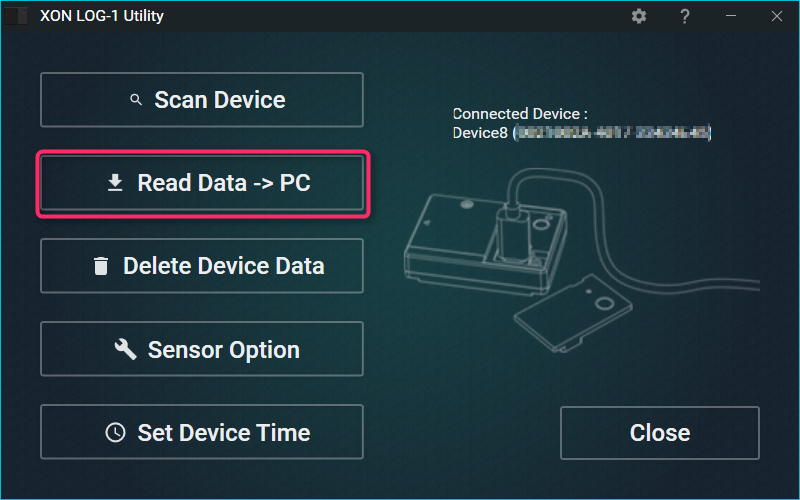
Application screen guide
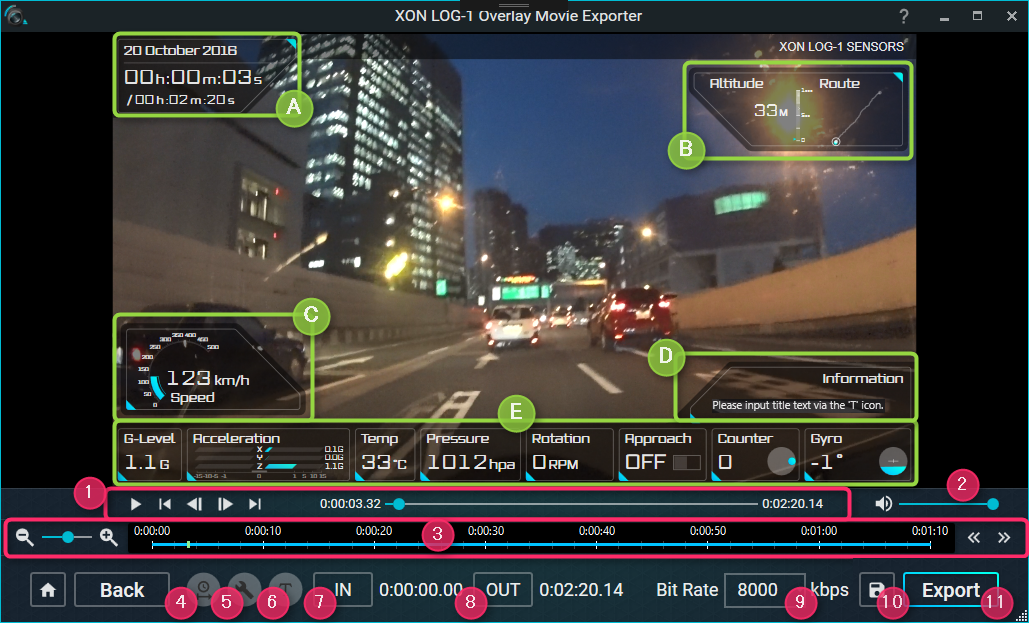
Log-1_exporter_edit_main-en

Overlay

(A) Date of Movie, Playback time, Duration
(B) Altitude, Route path
* Uses GPS data. Only appears if recorded by REC-1 camera.
(C) Speed
* Uses GPS data. Only appears if recorded by REC-1 camera.
(D) Text description (max. 3 lines)
*Text content can be edited in (6).
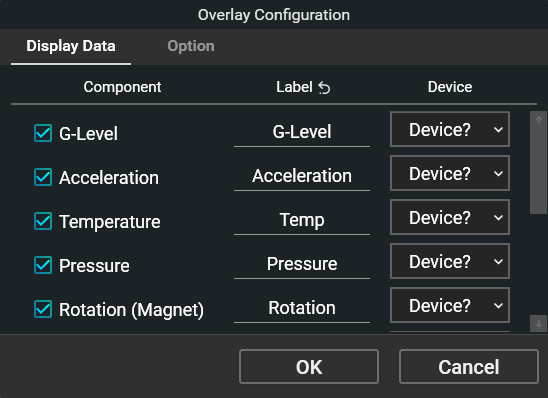
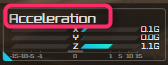
(E) Sensor data values of LOG-1
*For each part, set from the configuration settings in (5).

LOG-1 Values Details
G-Level Total acceleration
Acceleration 3-axis acceleration x:left and right, y:front and back, z:top and bottom
Temp Atmospheric temperature
Pressure Atmospheric pressure
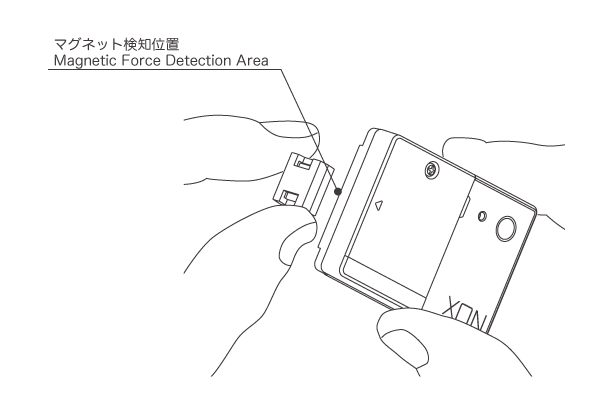
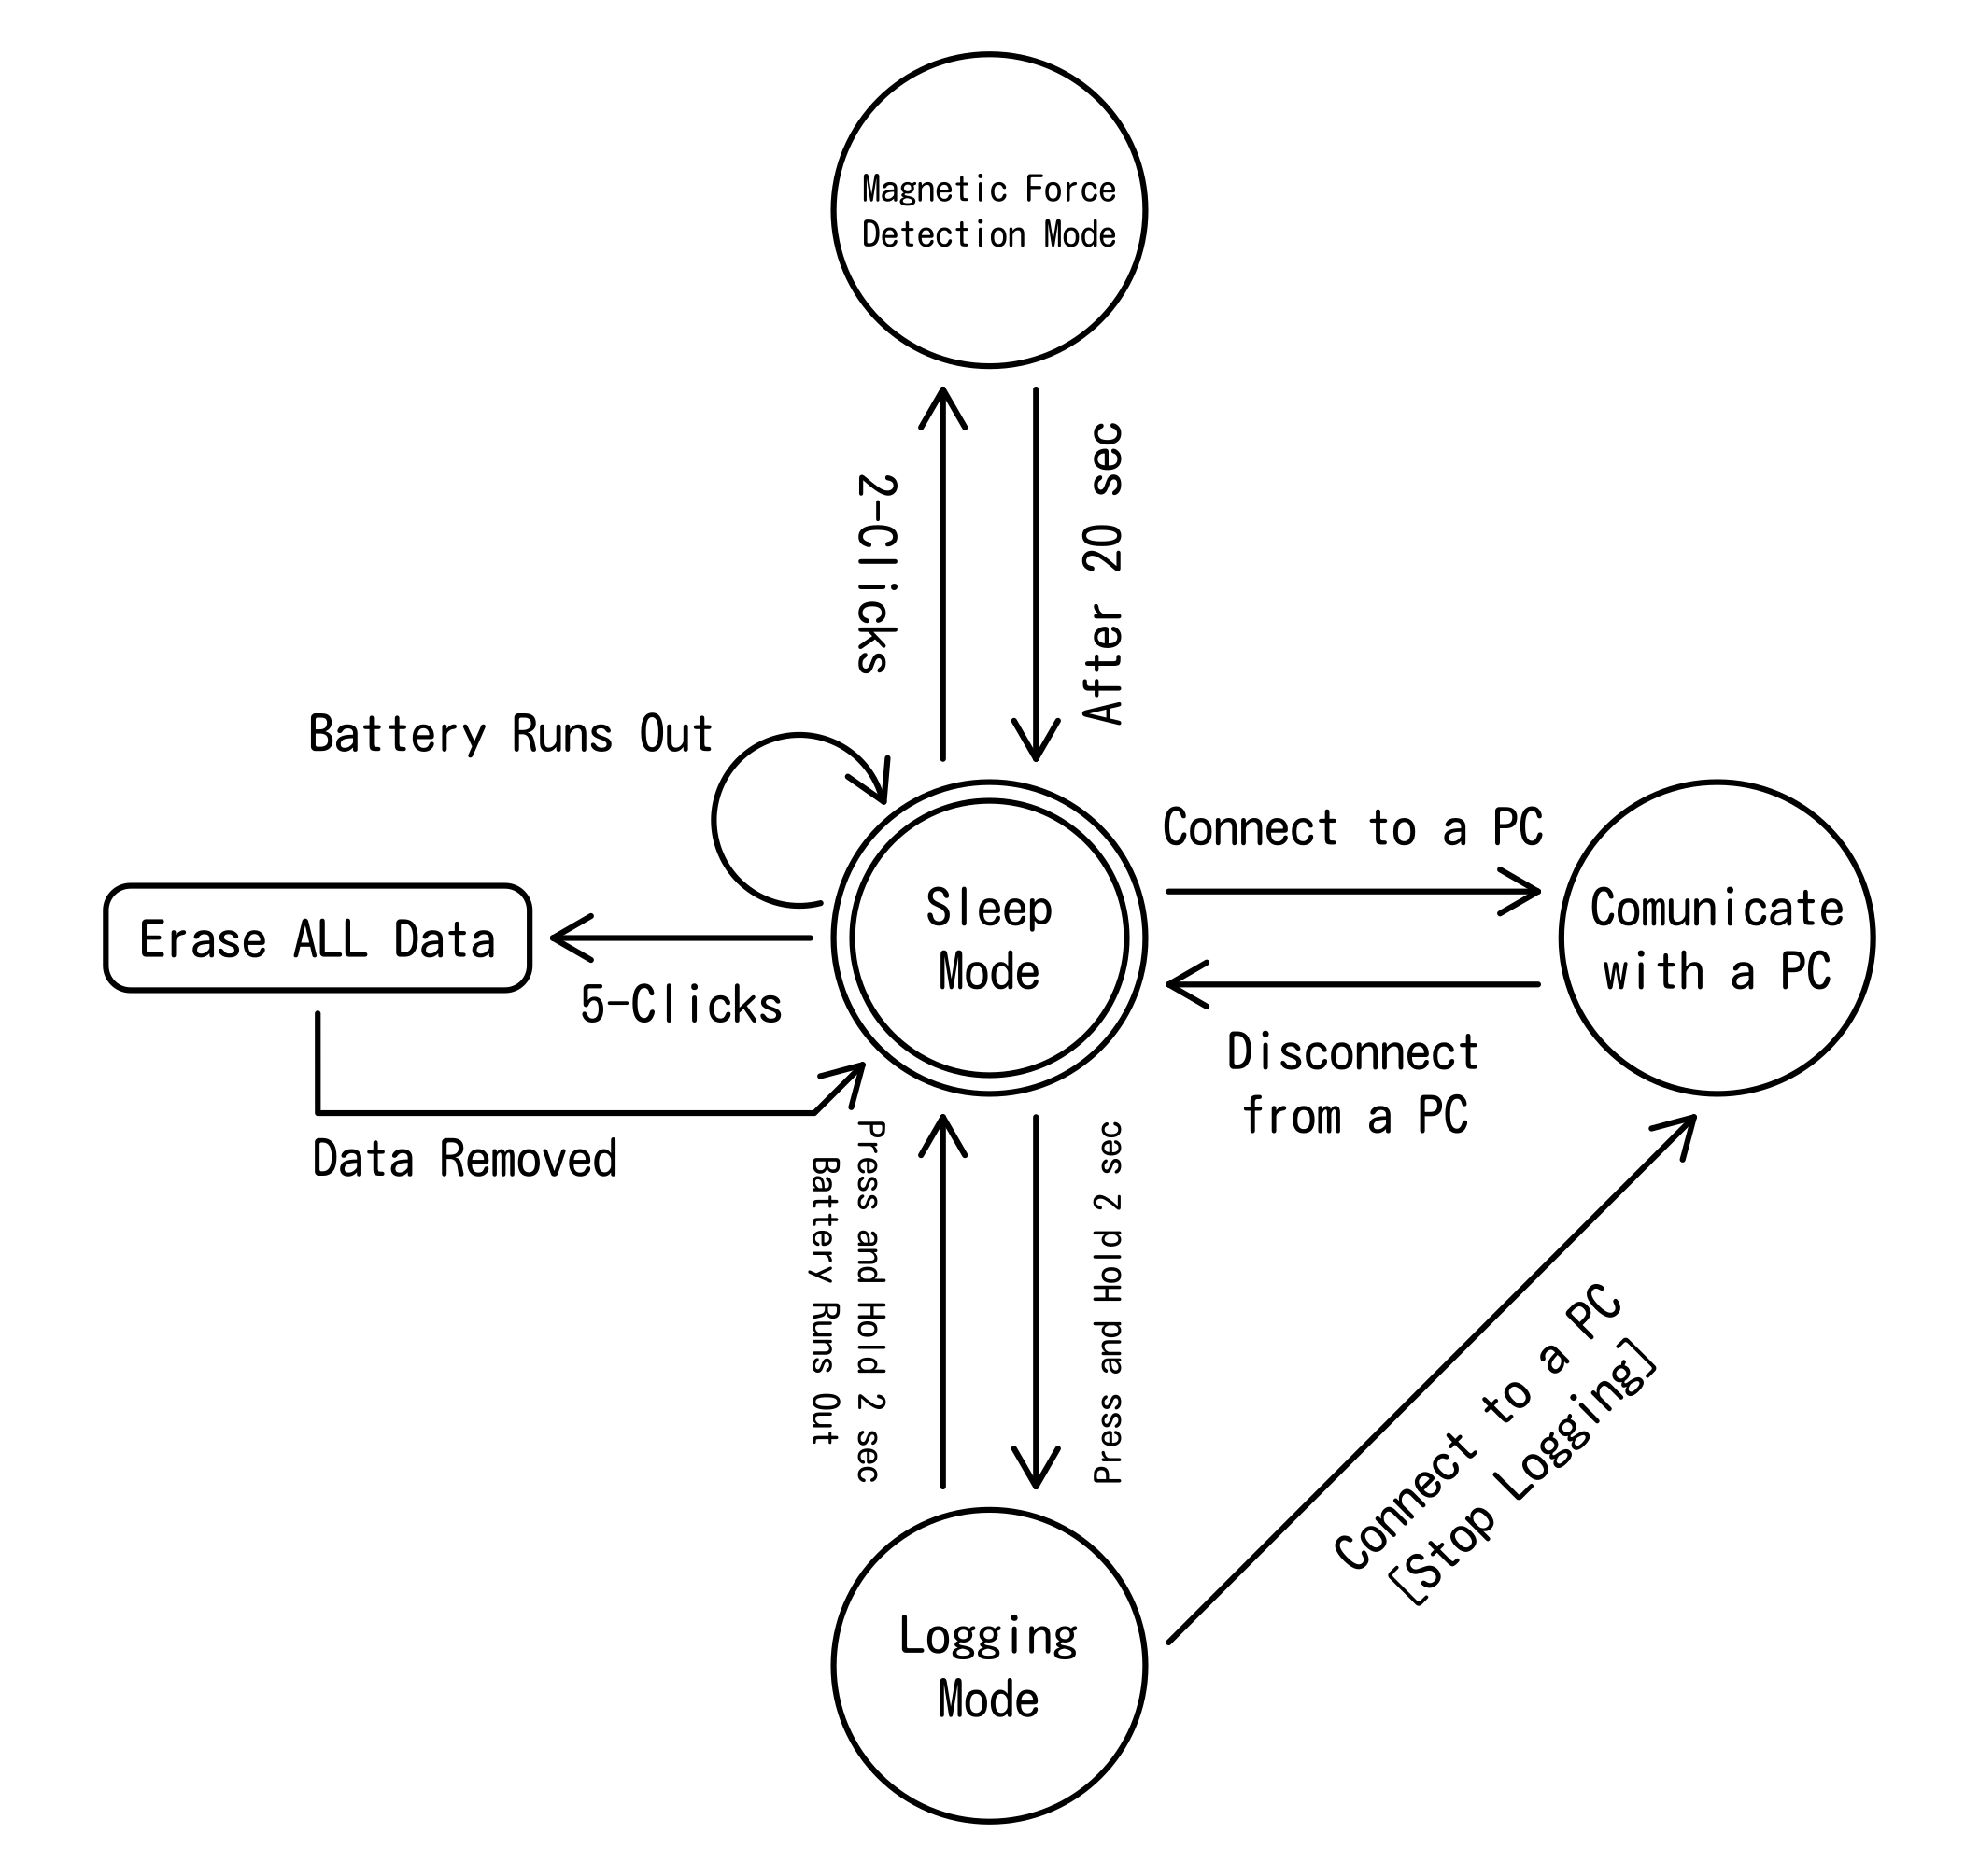
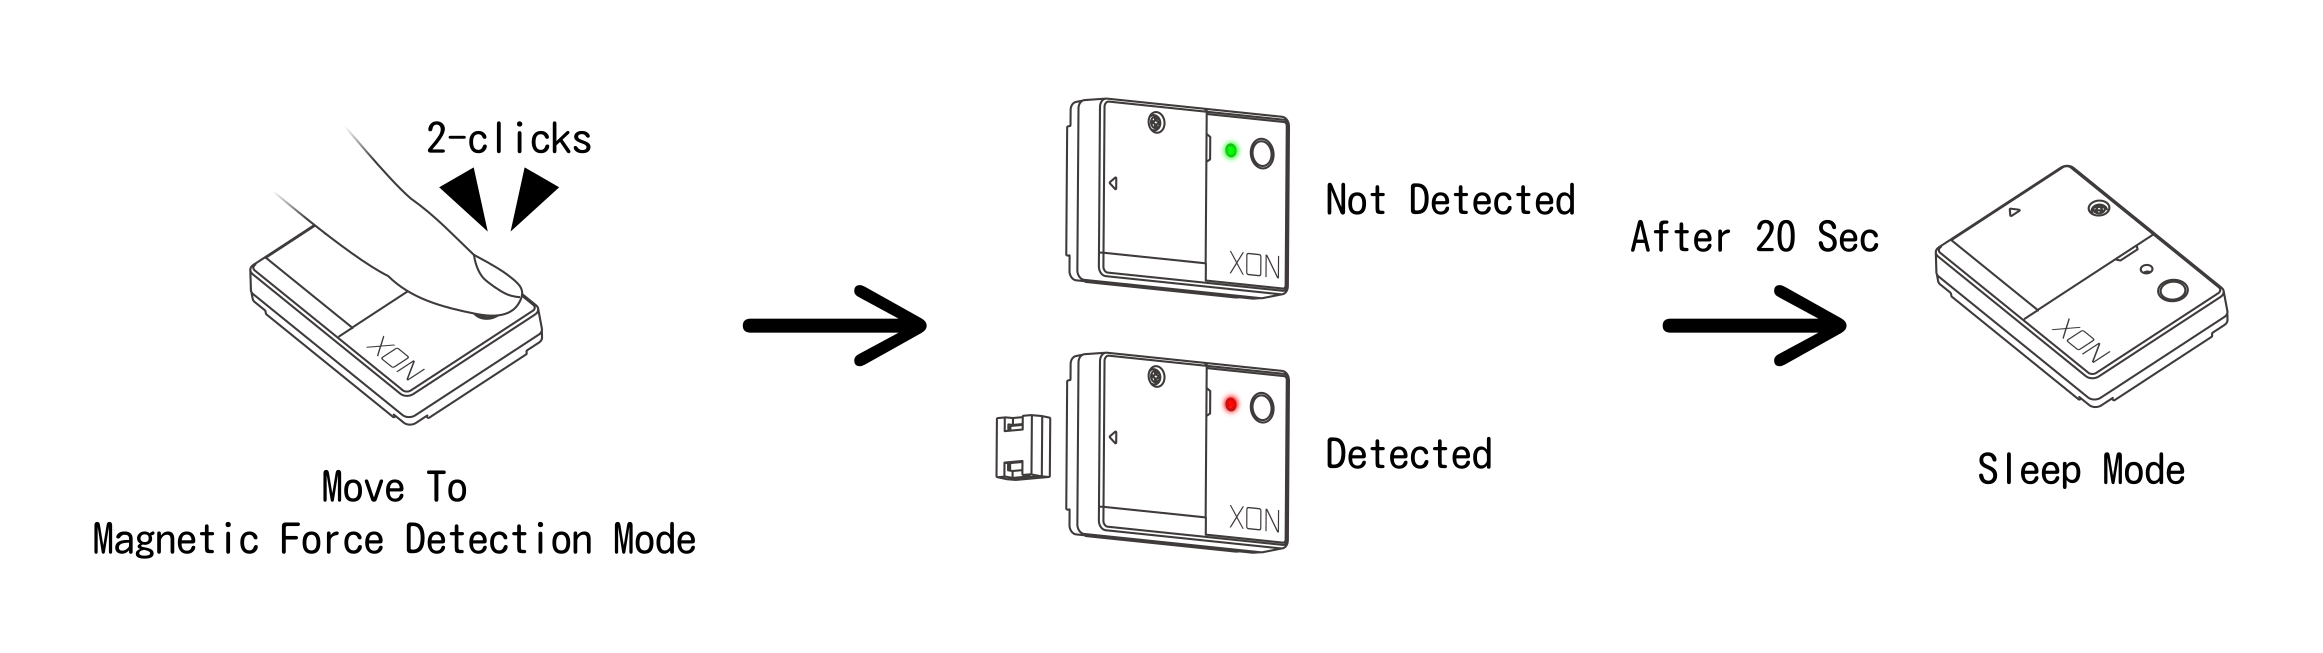
Rotation Rotation speed (using magnet sensor), when installed on bicycle or other vehicle tires, displays the speed of the rotation.
Approach Magnet detection state (using magnet sensor)
Counter Magnet detection times (using magnet sensor)
Gyro Angle (horizontal/vertical) by gyroscope

Control panels

(1) Play / Pause / Skip video
* You can seek to any playback position by dragging the playback bar.
(2) Volume adjustment
*Also applies to export.
(3) Timeline
-/+: Scale the timeline.
<<>>: Move timeline display range.
You can seek to any playback position by clicking the timeline bar.
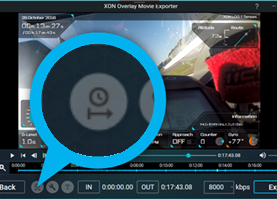
(4) Sync correction, calibration.
(5) Overlay data configuration setting.
* Refer to: [Editing Movies: Overlay settings].
(6) Editing the text information of (D).
(7) Start point of exported video range.
(8) End point of exported video range.
(9) Bitrate of exported movie.
(10) Save Project.
(11) Output video file with overlay.

Synchronizing movie time and LOG-1

You can synchronize the time of the device and the camera more accurately by doing the following –

1. Pause the device at the point where the device starts (after LED illumination) in the movie, and click the [Clock] button. 2. Automatic detection of data synchronization using the [Start] button to adjust the measurement starting point.
Log-1_exporter_edit_calibration0 ss2_app_calibration_start

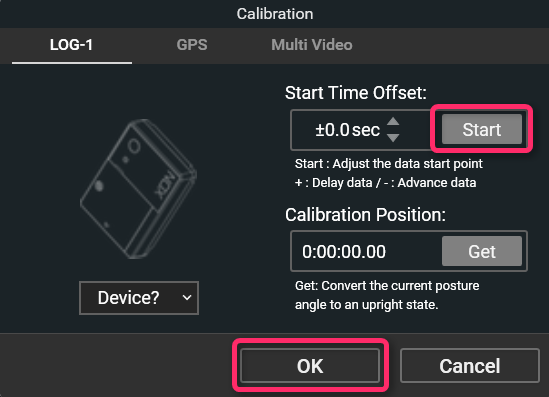
* The “Start” function needs to be enabled in the movie.
* You can fine tune in 1/10 second increments by clicking or entering numerical values.
* If the time is not set on LOG-1, or the time in the movie deviates by more than a few minutes, data corresponding to the movie will not be found.

Start calibration

Perform calibration at a position serving as a reference point of the gyro to synchronize the LOG-1 inclination and gyro data on the image.

1. Pause the movie temporarily with the attached device active and click the [Clock] button. 2. Click the [Get] button (to obtain the value of the current playback position) and then click the [OK] button.
Log-1_exporter_edit_calibration0 ss2_app_calibration_get

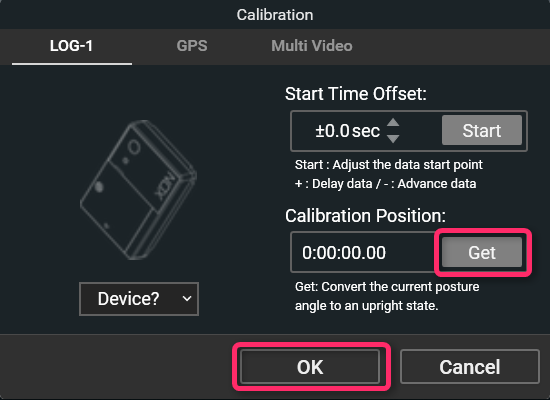
*You can not calibrate with LOG-1 in an OFF state.

Input information text

Input the information text using the text button (6). You can input up to 3 lines of text.
*If you delete all characters, the information part will be hidden.

Clip movie

Set the starting and ending points of the required video range.

  1. Drag the play bar (1), or click on the timeline (3), to pause at the starting point of the movie range.
  2. Click the “IN” button (7) and set it as the starting point.
  3. As in step 1, pause at the end point of the movie range.
  4. Click the “OUT” button (8) and set it to the end point.

*The GPS route will also be in the video range.

Export the movie

After editing the movie, output the movie.

  1. Click the “Export” button.
  2. Select a destination folder.
  3. Click “Save” button and wait for the movie to be exported.

*Export time may vary depending on the movie length, bit rate, or PC performance.

Editing Movies : Overlay Configuration

Set up the overlay from the Overlay Settings button.

Data point configuration (Display Data)

Configure each data point.

Log-1_exporter_edit_options1

  • Checkbox controls
    To change the display state of each data point.
    · LOG-1 sensor data: grayed out if checked OFF
    · GPS (route, altitude, speed) Various: hidden if checked OFF.
    *Information will be hidden when no characters are entered.
    *Date parts can not be changed.
  • Labels
    You can edit the item labels for each data point.
    Log-1_exporter_edit_option_label
  • Devices
    If you use more than one LOG-1 at the same time, you can select a device for each part.
    Please refer to the advanced version details. [Editing Movies: Advanced Guide]

Unit Settings, peak (Option)

Log-1_exporter_edit_options2

  • Speed ​​Unit
    You can switch between kilometers and miles per hour.
  • Altitude Unit
    You can switch between meters and feet.
  • Peak
    If Check box is ON, you can change the color of the parts during the movie, that exceed the threshold you set.
    * Speed ​​peak (maximum per hour display) is also available.
    * In the case of Auto speed peak, it is automatically calculated from the maximum value in the range of the movie.